
To print labels, open Inventory on a computer, select your items, click Print labels, pick the label that matches the stock loaded in your printer, set how many of each, click Print, and print the PDF at 100% / Actual Size.
Who this is for
- Vendors printing price tags for their own items
- Store admins, managers and cashiers printing labels for vendors
Before you start
- Use a Windows or Mac computer. Labels can't be printed from the Syncrostore mobile app or from an iPhone/iPad. The app has no print button.
- Check your printer. Syncrostore tests and supports the iDPRT SP310 / SP320 and DYMO LabelWriter printers. Other printers, such as TSC, Zebra, Munbyn or Niimbot, may work, but support can't set up their drivers. See Find your printer.
- Install the printer driver first. Make sure your computer can print a test page to the printer before you try Syncrostore.
- Sell in more than one store? Print from each store's own web address (
<store>.mysyncrostore.com). You're printing that store's items. - Syncrostore makes a PDF. Your computer and printer decide how it prints. Most problems come from one of two things:
- The label you chose in Syncrostore doesn't match the paper or label size set on your printer.
- The PDF is scaled, for example with "Fit to Page", instead of printed at 100% / Actual Size.
Step 1: Open Inventory and find the items
- Vendors: click Inventory in the menu. You only see your own items.
- Store staff: open Inventory > All items. Use the Vendorbox in the filter row (type the vendor # or alias) to show one vendor's items.
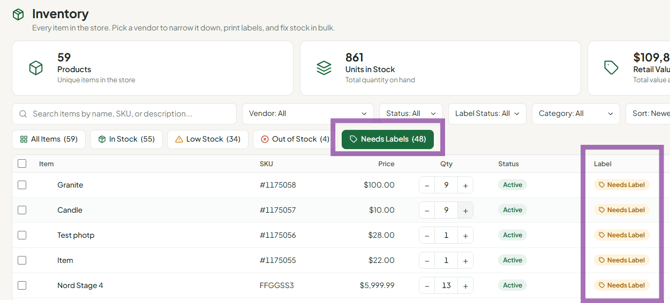
- Click the Needs Labels tab, or set Label Status: Needs label. After you print an item, Syncrostore marks it Printed, so this list shows what's still left to print.
Step 2: Select what to print
- Some items: tick the checkbox next to each item. The checkbox in the header selects everything on the current page. To select more at once, switch to 50 or 100 per page at the bottom. A bar with a Print labels button appears above the list.
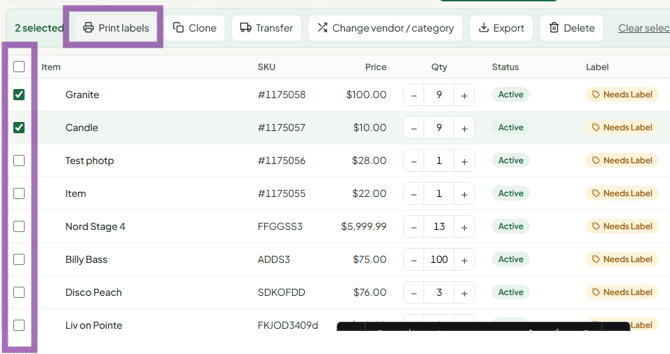
- Every item that still needs a label: open the ⋮ menu at the top right and choose Print all labels not printed. This covers every page and follows your current search and filters.
- One item: click … at the end of the item's row and choose Print label.
- Using Classic view (⋮ > Classic view)? Classic view has no checkboxes. Click the item row to select it (the row highlights), then use Print Options > Print Barcodes.
Step 3: Choose your label
The Print labels window opens. The Label box at the top shows the label you'll print on.
- Click Change. On a new computer, the picker opens by itself the first time.
- Choose the Printer: Dymo, iDPRT & others, or Inkjet sheet.
- Choose the Code: Barcode works with every scanner and is recommended. Choose QR code only if your store's scanners read 2D codes.
- Click the tile that matches the labels physically loaded in your printer, then click Done.
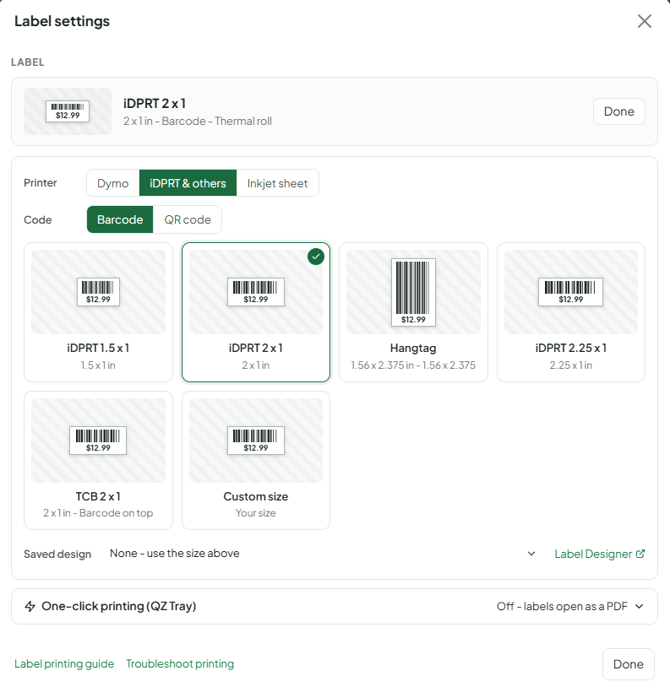
| Printer | Labels available |
|---|---|
| Dymo | Dymo 1.5 x 1 (30347), Dymo 3.5 x 1.125 (30252), Dymo 2.125 x 1 (30336), Jewelry 30299 (2-up), TCB 2.25 x 1 |
| iDPRT & others | iDPRT 1.5 x 1, iDPRT 2 x 1, iDPRT 2.25 x 1, Hangtag 1.56 x 2.375, TCB 2 x 1, Custom size |
| Inkjet sheet | Avery 5160 (30 per sheet), PLS892 2 x 1 (40 per sheet), Avery 8167 (80 per sheet) |
- No label printer? Choose Inkjet sheet and print on a regular desktop printer. Inkjet sheets print a standard barcode only. QR codes, custom sizes and Label Designer designs aren't available on sheets.
- Can't find a size you used before? Since July 2026, some older sizes (such as 1.1 x 3.5 and "Generic landscape") are no longer listed. Build them with Custom size (Step 4) or the Label Designer. On a DYMO, the closest match to a 2 x 1 label is Dymo 2.125 x 1 (30336).
- Store label designs: if your store built labels in the Label Designer, pick one from the Saved design dropdown under the tiles. To go back to a standard label, set Saved design to None - use the size above.
- Not sure which label your store uses? Ask the store. Many stores require a specific label.
- Syncrostore remembers your choice on this computer. To change it without printing, use ⋮ > Label settings.
Step 4: Create a custom size (only if your label isn't listed)
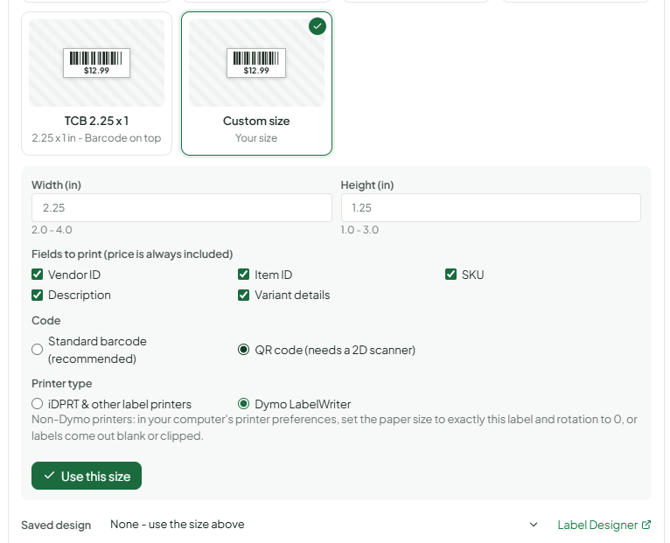
- In the label picker, choose iDPRT & others, then the Custom size tile.
- Enter the Width and Height in inches, from 2" x 1" up to 4" x 3". For smaller labels, use the Label Designer or the Jewelry 30299 preset.
- Tick the fields to print: Vendor ID, Item ID, SKU, Description, Variant details. The price always prints.
- Choose the Code: Standard barcode (recommended) or QR code.
- Choose the Printer type that matches your printer: iDPRT & other label printers or Dymo LabelWriter.
- Click Use this size. The size is saved to your vendor account and follows you to any computer.
Step 5: Set quantities and print
- Under How many of each, every item has its own line. An item with variants gets one line for each variant, such as each size or color.
- Each line starts at the quantity in stock. Change any number, or type a number in Set every quantity to and click Apply. Set a line to 0 to skip it. For example, if you added one new variant, set the other variants to 0.
- Click Print.
- Without QZ Tray: the labels open as a PDF in a new tab. If nothing opens, allow pop-ups for Syncrostore, or use the link in the message that appears.
- With QZ Tray: the labels go straight to the printer.
- Check the PDF, then print it at 100% / Actual Size. Never use Fit to Page, Fit to Width or Shrink to Fit.
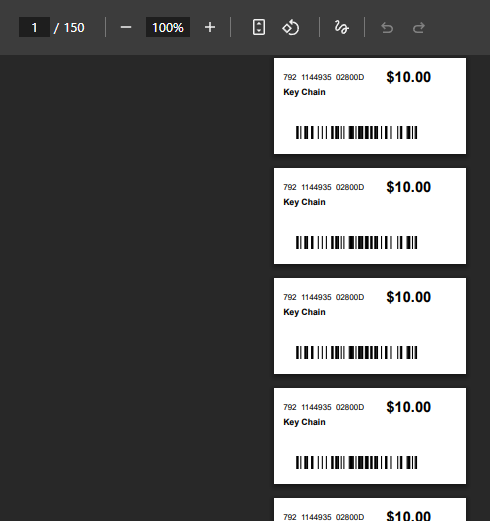
Printed status: after you print, items change to Printed. Editing an item puts it back on the Needs Labels list. To reprint a damaged label, click … on the row and choose Mark as needs label. Mark as printed removes an item from the list without printing. Generating the PDF for those items with QZ Tray off marks them printed without using any labels.
Step 6: Set up your printer (do this once)
Windows
- Close the label PDF and any open print dialog.
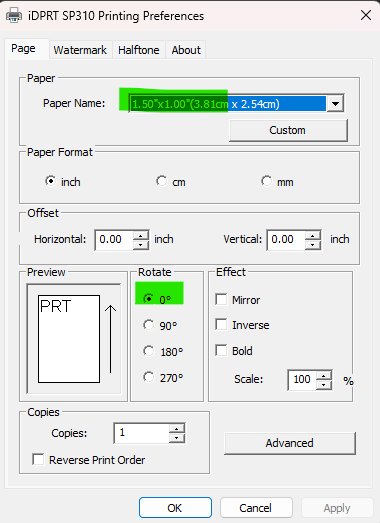
- Open Settings > Bluetooth & devices > Printers & scanners, select your label printer and click Printing preferences.
- Set Paper Size to match your label. Set Scaling to 100%, Offset to 0, and Orientation/Rotation to Portrait / 0. Turn off any mirror or invert option. Click Apply, then OK.
- Custom paper size: in Printers & scanners, click Print server properties, check Create a new form, enter the width and height, and click Save Form. Then choose that form under Paper Size.
macOS
- Open the label PDF and press Cmd-P. Select your label printer and click Show Details.
- Set Paper Size to match your label. If it isn't listed, use Manage Custom Sizes. Set Scale to 100% and Orientation to Portrait.
- Save these settings: open Presets, choose Save Current Settings as Preset, and pick it next time.
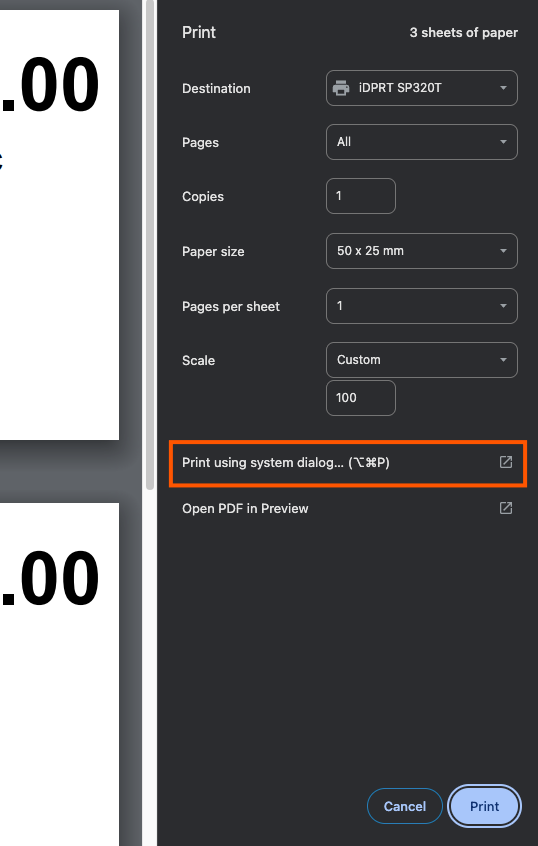
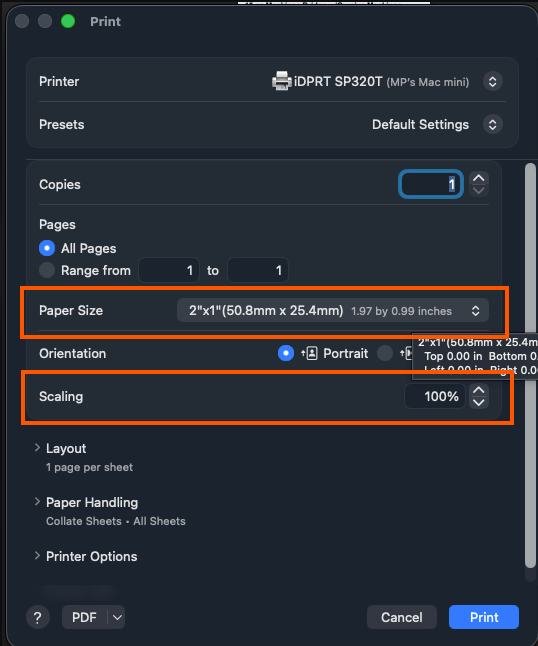
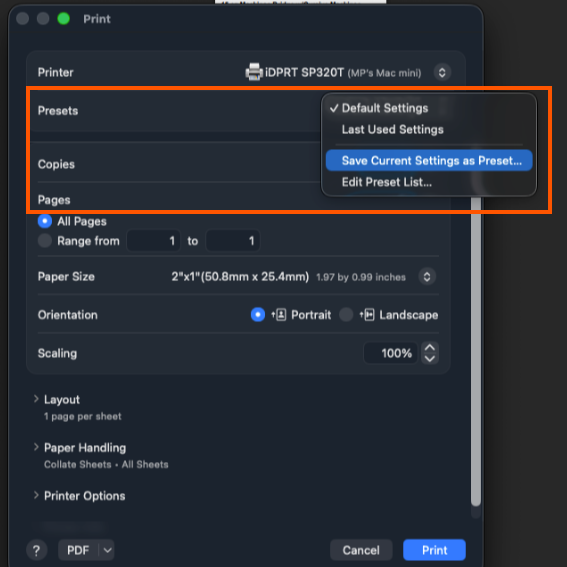
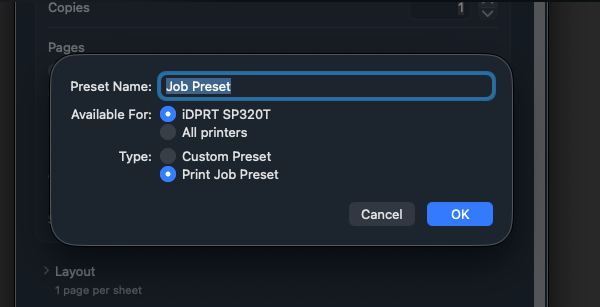
DYMO printers detect their own label size. iDPRT, Zebra and TSC printers don't, so their paper size must be set by hand.
Step 7: One-click printing with QZ Tray (optional)
QZ Tray is a free app that sends labels straight to your printer, without the PDF. You don't need it. Get PDF printing working first, because QZ Tray won't fix a printer that can't print the PDF.
- Install QZ Tray from qz.io/download and make sure it's running (look for the tray icon). Restart your computer after installing.
- Refresh Syncrostore. In the Print labels window, or ⋮ > Label settings, open One-click printing (QZ Tray).
- Click Detect printers, select your label printer and click Test label.
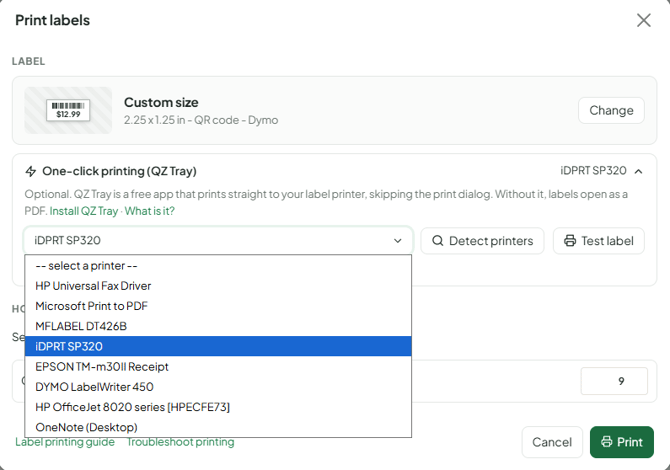
- To go back to the PDF: clear the printer in that section (it then reads "Off – labels open as a PDF"). You can also right-click the QZ Tray icon in the system tray and choose Exit, or uninstall QZ Tray.
- "Invalid signature" / "Cannot verify trust" pop-up: install the latest QZ Tray from qz.io/download, restart your computer, then choose Remember this decision and Allow.
- TSC and Zebra printers often don't work with one-click printing. If QZ Tray reports success but nothing prints, use the PDF.
- Full setup: Integrated Label Printing Setup with QZ Tray
Prices on labels
You don't choose prices at print time. Syncrostore prints the prices that match your store's pricing setting:
| Your store uses | The tag shows |
|---|---|
| Dual pricing | Both prices: the credit card price and the cash price |
| Vendor Choice | The credit card price only |
| Neither | The cash price only |
Cash and check customers get the cash price at checkout automatically; the cashier doesn't apply anything.
- Tag prices don't include sales tax. Tax is added at checkout.
- Labels can't show custom words such as "Cash" or your shop name.
What's in the barcode
The barcode holds an internal Syncrostore ID (GlobalItemID). It is not your SKU, UPC or Item ID, so a scan won't match those numbers. That's expected. For variant items, the code identifies the exact variant. To find an item by scanning it on the Inventory page, click Scan Universal ID first. See What is being encoded in the barcode?
Troubleshooting
- Labels too small, too large, sideways, cut off or misaligned: the printer's paper size doesn't match the label, or scaling is on. Match the paper size, set rotation to 0 and print at 100%. On a Custom size, check that Printer type (iDPRT & other vs. Dymo) matches your printer.
- Blank labels: turn QZ Tray off and look at the PDF. If the PDF looks right, the cause is the printer driver or its settings. Print a test page outside Syncrostore, and reinstall the driver for your exact model.
- Nothing happens / no PDF: allow pop-ups for Syncrostore and hard refresh (Ctrl+F5, or Cmd+Shift+R on a Mac). If QZ Tray is installed, turn it off and try the PDF.
- Labels print automatically when I want to see the PDF: QZ Tray is on. Clear the printer in One-click printing or exit QZ Tray.
- Only one label prints: check the quantity on each line under How many of each.
- Barcodes print too dark, blotchy or won't scan: lower the print density/darkness in the printer's Printing Preferences. See How to fix barcode labels not scanning.
- QR code won't scan: the store's scanner only reads 1D codes. Switch Code back to Barcode and reprint.
- Variant size/color doesn't show: preset labels show one short description line. Use a Custom size with Variant details ticked, or build a label in the Label Designer.
- Long descriptions are cut off: preset labels print one description line. Use a larger custom size or the Label Designer.
- Inkjet sheet rows drift down the page: the PDF was scaled. Print at 100% / Actual Size.
- Printer worked yesterday and stopped: turn the printer off, unplug it for 30 seconds, then restart the computer. A Bluetooth printer may need the computer restarted.
- Labels printed at one store don't scan at another: each store has its own inventory. If an item isn't set up at the store, the register shows Not set up at this store and offers to ring it as a manual item. Move the item with the bulk bar Transfer on the Inventory page, then print new labels at the receiving store.
Still need help?
- a screenshot of the Print labels window showing your label
- a screenshot of your printer settings
- a photo of the printed label
- your printer make and model
- whether you print from the PDF or with QZ Tray
Vendor training webinars run Mondays at 4:00 PM Central.
