
Open your inventory (vendors: click Inventory; store admins: Inventory > All Items), click Add New, fill in at least Title, Quantity and Price, then click Finish. To add lots of simple items quickly, use Quick Inventory. For a spreadsheet, use the Import Wizard.
Who this is for: Vendors adding their own items. Store admins use the same form from Inventory > All Items.
Three ways to add items
| Method | Best for |
|---|---|
| Add New | One item with full detail: photos, categories, variants, deals, SyncroAI lookup |
| Quick Inventory | Typing in many simple items fast (title, quantity, price) |
| Import | A spreadsheet of items. See How do I import my inventory from a spreadsheet? |
Before you start
- Use a computer, logged in at your store's own address (
yourstore.mysyncrostore.com), not the help site. You can add items in the phone app, but photo upload, label printing and deleting need a computer. - If you sell at more than one store: check the store name at the top of the page. Items are added to the store you're logged in to. See Why does my inventory go to the wrong store?
- If you see "Inventory Management Disabled. Contact your Store Owner": your store has turned off inventory access for your vendor account. Only the store can turn it back on.
Add New: step by step Video: Adding an item with Add New ·
1. Open the item form
- Go to your inventory:
- Vendors: click Inventory in the menu.
- Store admins: click Inventory, then All Items.
- Click Add New at the top right of the Inventory page.
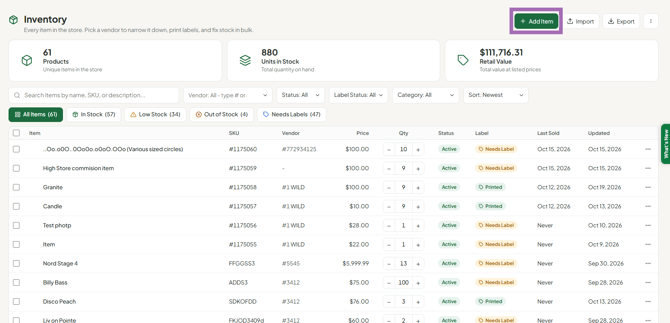
The item form opens, already linked to your vendor account. It's split into sections; only Basics is required.
2. Optional: let SyncroAI fill in the details
SyncroAI can look the item up and fill in the title, description, price, photos and dimensions for you.
- Click the green AI button in the SyncroAI banner at the top of the form.
- Choose a mode:
- Auto: general merchandise, clothing, household goods, electronics and antiques.
- Games/TCG/Comics: trading cards, video games and comics, with graded pricing from PriceCharting. Pick the Product Type first.
- Enter what you know (a description, SKU or UPC) and, if you like, upload a clear, well-lit photo. More detail gives better matches.
- Click Look Up. Click View on a result to see the details, or Use to fill in the form.
- Check everything before you save. SyncroAI's values are suggestions, and it adds every photo it finds, so delete any you don't want.
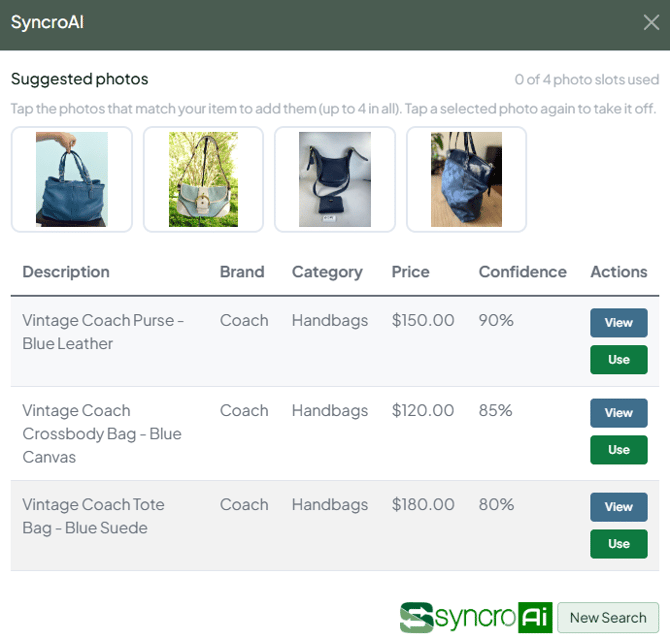
More: How do I use SyncroAI to fill in my item details? and How do I look up prices for trading cards, games or comics?
3. Basics (required)
- Title: the item name. Keep the important words first: only the first part prints on the tag.
- Quantity: how many you're putting out. Must be more than zero.
- Price: what the customer pays. Type the number only, without a
$. - Cost of Item (optional): what you paid. Fill it in if you want profit and inventory value in your reports. For amounts under $1, type a leading zero, e.g.
0.50. - SKU (optional for single items): your own item code, letters and numbers. Must be unique in the store.
- UPC (optional): the product's barcode number, digits only. Put codes with letters in SKU instead.
- Tip: to copy an existing barcode, click in the SKU or UPC field and scan it.
You don't need a SKU or UPC: Syncrostore gives every item its own ID and barcode automatically. 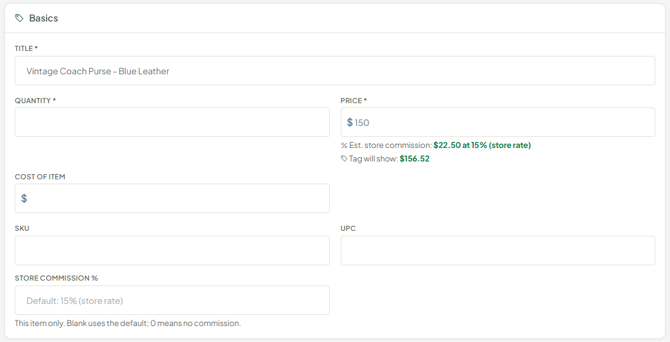
4. Photos (optional)
Add up to four photos below Basics. They help you tell similar items apart, and they're used on TrinketVault if your store sells online. 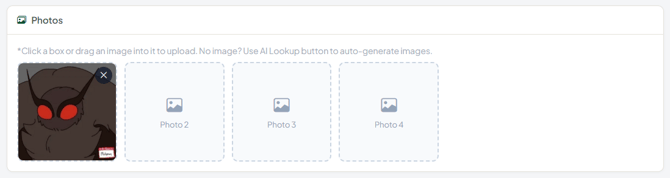
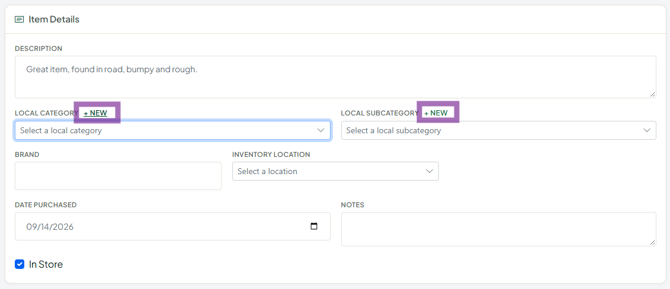
5. Item Details (optional)
- Description: a longer description. It doesn't print on the tag.
- Local Category / Subcategory: pick a category first, then a subcategory. To create a new one, click + New above the field, type the name, and it's saved when you finish the item.
- Categories are shared across the whole store, so check your store's rules before creating new ones.
- Use them: reports group sales by category, and category discounts (like a seasonal "Christmas" sale) only work on items that have one.
- Brand: works the same way as categories.
- Inventory Location: where the item sits in the store. Retail stores set these up in Store Mapping.
- In Store: tick it if the item is physically at the store. It doesn't stop the item being sold.
- Date Purchased and Notes: for your own records. Notes don't show on the main inventory grid.
6. Product Variants (optional)
Use variants for one item in several sizes, colors or scents, all on one listing.
- Add an attribute (for example Size) and its values (Small, Medium, Large). Each attribute can have up to 20 values. Your store may also offer ready-made Prefabs.
- Click + Add Variant once per variant and pick its value.
- Give every variant its own Quantity, Price and SKU. Variant SKUs are not created automatically and must be unique.
- To set prices or quantities for many variants at once, use Bulk Actions in this section.
Full guide: How do I add sizes or colors (variants) to an item? 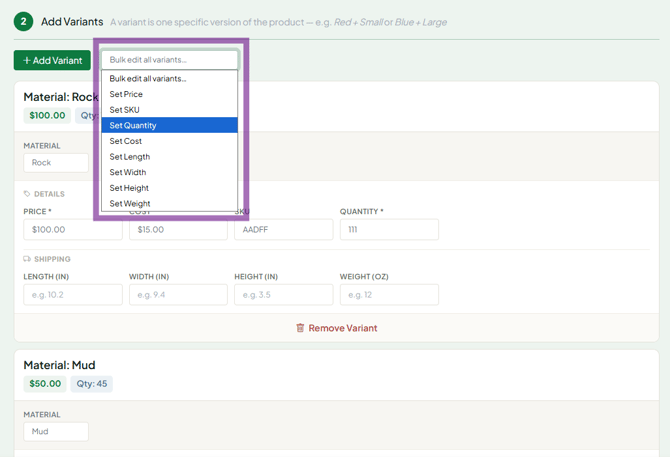
7. Resell
Your vendor ID is filled in automatically. Store admins adding items for a vendor choose the vendor here. Sales tax settings (a custom tax rate, or tax exempt) can only be set by a store admin. See How do I make an item tax exempt?
8. Online / TrinketVault (only if your store sells online)
- Publish on TrinketVault: lists the item on your store's TrinketVault shop.
- Offer Shipping: only tick this if you'll ship the item. If it's ticked without package size and weight, the item won't save. Untick it if you're not selling online.
9. Deals (optional)
Set quantity pricing for this item, such as "3 for $10" or "buy 2, get 1". Deals apply to this item and its variants only. See How do I set up a deal like 3 for $10 or buy 2 get 1?
10. Save Item
Click Save Item to save the item. It now appears on your Inventory page, ready for a label. See How do I print price tags and barcode labels?
When you open a saved item later, Sales History lists every sale that included it.
Quick Inventory: many simple items fast
Video: Adding items with Quick Inventory ·
Quick Inventory only takes Title, Quantity, Price, Cost and SKU/UPC. Photos, descriptions, categories and variants can be added afterwards by opening each item.
- On the Inventory page, click Quick Inventory.
- Enter Title, Quantity and Price (plus Cost and SKU/UPC if you like), then click Add Item. The item goes into a waiting list. Repeat for each item.
- Click View Before Commit to check the list. You can fix any field here.
- Click Commit All.
Nothing is saved until you click Commit All. If you leave or refresh the page first, the list is lost. 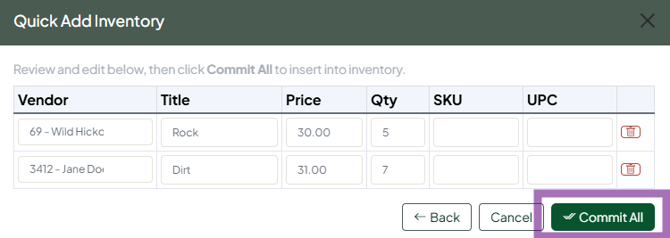
Faster ways to add similar items
- Copy an item: click the item to select it, then click Clone Items in the right-hand menu. Open the copy to change what's different.
- Same items at another store: don't re-enter or re-import them. Use Transfer Items. See How do I move or copy my inventory to another store?
- Change prices or quantities on many items: see How do I update prices or quantities for many items at once?
Troubleshooting
- "Inventory Management Disabled. Contact your Store Owner": your store has turned off vendor inventory access. Ask the store to turn it back on.
- "Quantity must be more than zero": enter a quantity. For variant items, every variant needs one.
- Error when Cost is under $1: type a leading zero, e.g.
0.20, not.20. - Price saved as $0: retype the price rather than accepting an auto-filled value, then save again. If items keep losing prices, do a hard refresh (Ctrl+F5, or Cmd+Shift+R on a Mac).
- "SKU required" on a variant item: give each variant its own unique SKU.
- UPC error: UPCs must be digits only (13 or fewer). Put letter codes in SKU.
- Missing shipping information when finishing: untick Offer Shipping in the Online / TrinketVault section, or fill in the package size and weight.
- Category "not found" when typing a new one: click + New above the field to create it.
- Can't choose a subcategory: choose the main category first.
- Category list shows numbers: scroll down the list; the names appear below them.
- No photo upload area: you're probably in a phone browser. Use a computer.
- SyncroAI says "AI returned a non-JSON response" with a photo: type a description instead of uploading a photo, then look up again.
- Quick Inventory items disappeared: they weren't committed. Re-enter them and click Commit All before leaving the page.
- Item went to the wrong store: switch to the right store at the top of the page and use Transfer Items to move it.
- Can't find Add New: make sure you're on your store's own address, not the help site, and zoom out (Ctrl and minus) if the page looks cut off.
