
The Label Designer lets you build your own label layout: set the size, place fields such as price, description, SKU and barcode, save it, and pick it as a Saved design when you print.
Who this is for
- Vendors who need a size or layout the standard labels don't offer, such as bigger text, variant details, a QR code or very small labels
- Store admins who want one store-wide label for every vendor
Open the Label Designer
- Go to Inventory, select an item and click Print labels.
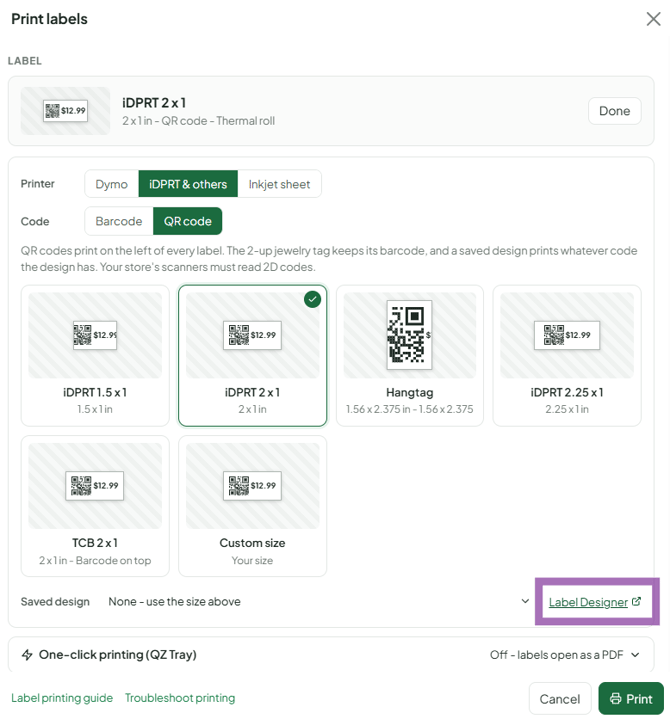
- In the Label section, click Change. Under the tiles, click the Label Designer link next to the Saved design dropdown. It opens in a new tab. In (Legacy) Classic view it is Print Options > Advanced print options > Open Label Designer
The screen has four areas: Add fields (left), the Canvas (center), Properties (right) and Saved designs (left, under the fields).
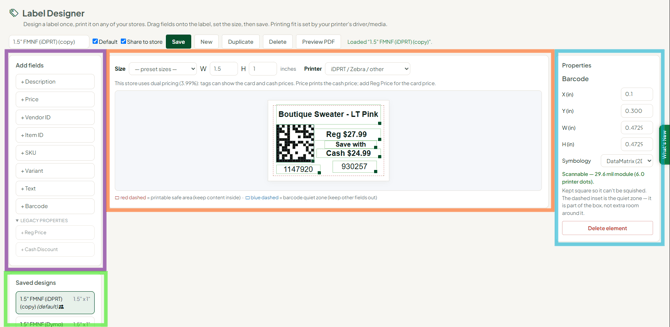
The designer shows sample data. You can't type your own item details into it. When you print, each item's real description, price and codes fill in automatically.
Step 1: Set the label size
- Above the canvas, pick a preset size, such as 1.5 x 1 Dymo 30347, or type your own W (width) and H (height) in inches.
- Match the size to the label stock loaded in your printer.
Step 2: Add fields
Click a field under Add fields to drop it on the label:
- Description: the item name
- Price: the price for your store's pricing setting
- Reg Price: the regular (card) price, for dual pricing
- Vendor ID, Item ID, SKU: identifiers. SKU prints only if the item has a SKU.
- Variant: the variant details (for example, Color: Red Size: M)
- Barcode: a scannable code
You can add Custom Text if necessary.
Step 3: Position, resize and style
- Drag an element to move it. Drag the green handle at its bottom-right corner to resize it.
- In Properties, set position, width/height, font size, bold and alignment.
- Keep everything inside the red dashed line (the printable safe area). Keep other fields out of the blue dashed barcode quiet zone.
Barcodes
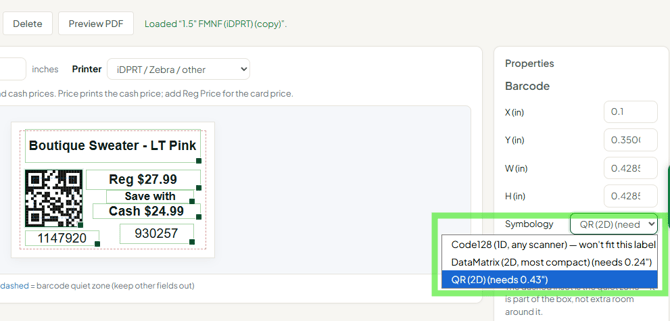
- In Properties > Symbology, choose Code128 (works on every scanner; recommended), or QR / DataMatrix (only if your scanners read 2D codes).
- Barcodes have a minimum size so they scan. Code128 barcodes come in fixed widths of about 2.11" and 2.81". On a 2" x 1" label a Code128 barcode fills almost the whole width. For small labels, use QR, which resizes to fit.
Step 4: Preview and save
- Click Preview PDF to see the label at true size.
- Type a name at the top.
- (Optional) Tick Default to make it your go-to label.
- (Store admins, optional) Tick Share to Store so every user in the store can choose it under Saved design.
- Click Save.
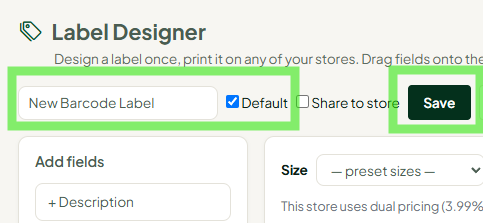
Saved designs are tied to your login, so you'll have them in every store you sign in to. Under Saved designs you can open, create (New), Duplicate or Delete designs.
Print with your design
- On Inventory, select the items and click Print labels.
- In the label picker, choose your design from the Saved design dropdown and click Done.
- Set quantities and click Print. Print the PDF at 100% / Actual Size.
Dual pricing (two prices on one label)
Under Legacy Properties, the Cash Price and Reg Price fields always show the cash-discount price and the regular price. In the designer, Reg Price is the card price and Price is the cash price, and neither prints a text label beside it. Two-price labels are for dual pricing stores. Vendor Choice stores print the credit card price only, and other stores print the cash price.
Troubleshooting
- I can't type my item's details into the designer. That's expected. The designer shows sample data, and real data fills in when you print.
- The label prints the wrong size or cut off. Match the printer's paper size to the design, print at 100%, and turn QZ Tray off to check the PDF. The PDF is exact, and your printer driver controls the fit.
- The barcode won't scan. Make it bigger, keep other fields out of the blue quiet zone, use Code128 if your scanners are 1D only, and lower the printer's darkness/density.
- Text is cut off. Give the text box more height or lower the font size.
- A shared store design disappeared. Store admins can share or remove shared designs. Ask your store, or build your own.
- My design isn't in another store or on another computer. Designs follow your login. Sign in with the same account. A store-wide design must be shared with Share to Store.
- The store's default design doesn't show variants. Pick the standard TCB 2 x 1 label under iDPRT & others, or ask the store admin to add the Variant field to the shared design.
- Can I use a custom design on an inkjet sheet (e.g., Avery 5160)? No. Custom designs print on label printers only.
