
If a label looks fine but won't scan, the printer settings are almost always the cause: usually print darkness set too high, scaling, or the wrong label size. Work down this list and test-print one label after each step.
Who this is for: Vendors printing tags at home, and store staff whose scanners won't read printed tags.
These steps use the New Experience. If your menu looks different, click Switch to New Vendor Experience (vendors) or Switch to New Experience (staff) at the top of the page.
Syncrostore supports iDPRT SP310/SP320 and DYMO label printers. TSC, Zebra and Munbyn printers are not supported, but they can work. See Find your printer.
First: is it the label or the scanner?
- Turn QZ Tray off and print the PDF. On Inventory, open More (⋮) > Label settings and set One-click printing (QZ Tray) to Off - labels open as a PDF. Zoom in on the PDF. If the barcode in the PDF is sharp, Syncrostore made it correctly and the fix is in your printer settings.
- If you chose QR code under Code in the label settings, make sure the store's scanners read 2D codes. If they don't, switch Code back to Barcode and reprint.
- Hold the label still, a few inches from the scanner, so the whole code is in the beam.
- Don't test by scanning into the Inventory search box. It looks for item names, SKUs and descriptions, not the label code. To find an item by scanning, open More (⋮) > Classic view and use the Scan Universal ID box there.
- At the register right now? Type the Item ID printed on the label or search by description, and fix the label later.
Fixes (all printers)
- Print at 100%, never "Fit to page". Set the paper size to the exact label size in Printing Preferences, with margins None. Scaling makes the bars blur.
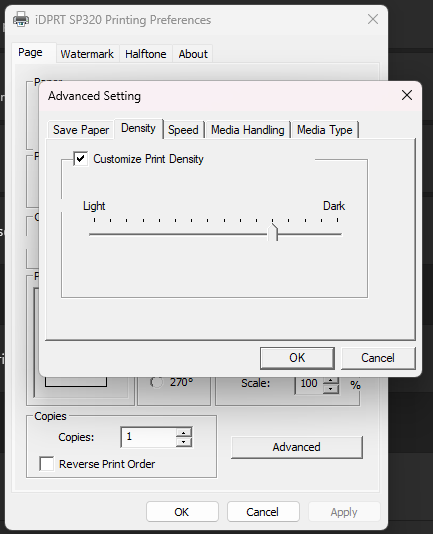
- Turn the darkness/density down. Bars that are too dark bleed together. This is the most common cause support finds. If the bars look thick and the gaps thin, lower the darkness 2–3 steps. If they look faded or streaky, raise it 2 steps.
- Slow the print speed to about 3–4 ips in Printing Preferences.
- Use the right label in Syncrostore. In the label picker (Print labels > Change, or More (⋮) > Label settings), pick the Printer you own and a format under it, such as a Dymo format for a DYMO. Don't use an Inkjet sheet label on a thermal printer.
- Give the barcode room. If the barcode is squeezed on a small label, use a larger label, or a QR code if your scanners read 2D codes. Keep at least 1/8" of blank space on both sides of the barcode.
- Check the label stock. Thermal printers need direct thermal labels. Labels left in heat or sunlight turn grey and won't scan, so try a fresh roll. Don't print a barcode across a hangtag fold.
- Clean the printhead. Power off and wipe it with a lint-free swab and 90%+ isopropyl alcohol. If a defect repeats in the same line on every label, this is the cause.
- Reinstall the driver for your exact model, then restart.
iDPRT (SP310, SP320 and other SP models)
- In Printing Preferences > Options/Advanced, set Dithering (also called Halftone or Graphics Mode) to None or Threshold.
- Set Media Type to Gap for die-cut labels, then run auto-calibration: with the printer idle, hold the feed button until it feeds a few labels and stops. Repeat whenever you change label size or brand.
- Start darkness around the middle of the range (about 8 on 0–15).
DYMO LabelWriter
- Windows: in Printing Preferences > Advanced, set Quality to Barcodes and Graphics and Print Density to Light or Medium.
- Mac: in the print dialog, lower the print density/quality option and save it as a Preset.
- In Chrome's print dialog, set Scale to Default/100%, not Fit to page.
Still not scanning?
The Print labels dialog has a Troubleshoot printing link. If that doesn't help, send support a photo of the bad label next to a ruler or coin, your exact printer model, the label you picked in Syncrostore, and a screenshot of your Printing Preferences.
