
Go to Store Management > Store map, pick an element (such as Booth or Wall) in the toolbar, click + Add, drag and resize it, set its details in the Selected element panel, and click Save. Changes aren't saved automatically.
Who this is for: Store admins and managers. Use a computer or tablet, not a phone.
These steps use the New Experience. If your menu looks different, click Switch to New Experience at the top of the page.
The store map opens on a classic page.
Steps
- Go to Store Management > Store map. (Or Store Management > Overview and click Open store map.)
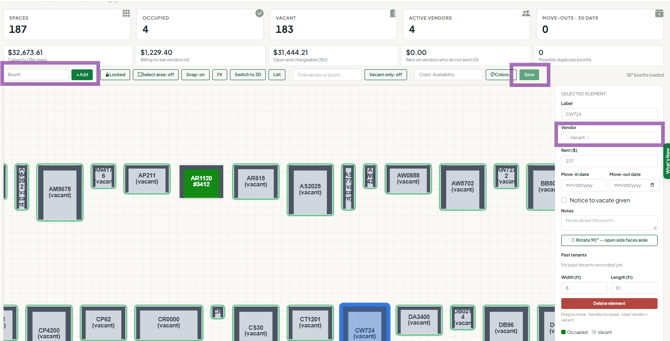
- In the element menu at the left of the toolbar, choose what to add, then click + Add:
- Booth or Oval booth - a rental space
- Wall and Door - the shape of your floor
- Register / Checkout - your counter
- Text label - a sign or note on the map
- Zone / Area - an outline for a room or section
- Elements start Locked so you can't move a booth by accident while you pan. Adding an element unlocks the map. To move existing elements, click Locked to unlock.
- Move an element by dragging it. Resize it with the corner handles, or type Width (ft) and Length (ft) in the Selected element panel. Turn Snap on to line things up on the grid.
- Click an element to select it. In the Selected element panel:
- Type the booth number vendors know in Label (a zone uses Zone name, a text label uses Text).
- For a booth, click Rotate 90° — open side faces aisle to turn it.
- Click Delete element to remove it.
- To work on several elements at once, Shift-click them, Shift-drag a box around them, or turn on Select area and drag. Then drag them together (the map must be unlocked), or click Delete selected. Press Esc to clear the selection.
- Click Save before you leave the page. The status next to it shows Saved ✓ when it's done.
- To fill in a booth's vendor, rent and dates, see How do I assign a vendor to a booth and set the rent?
Use Fit to show the whole floor, Switch to 3D for a 3D view, and List for a table of every booth.
Rules
- A space is the booth, not the tenant. When a new vendor moves into an existing booth, assign them to that booth. Don't add a new booth for it.
- If you add a booth with a label that already exists, Save fails with "Booth ... already exists". Assign the vendor to the existing booth instead.
- If a booth is split between two vendors, give the second half its own label, for example B-13-2.
- Don't stack a copy of a booth on top of another; it creates a second rent charge. Check Possible duplicate booths at the top of the page.
- Deleting an element removes nothing until you click Save.
Troubleshooting
- I can't drag a booth: the map is Locked. Click Locked to unlock it.
- Save failed: read the message next to Save. If someone else changed a booth while you had the map open, reload the page and make your change again.
- "vendor(s) are assigned to more than one booth. Save anyway?": check the booths in List before saving. A vendor can rent two booths, but a duplicate booth bills twice.
- Vendor charged rent twice for one booth: look for a duplicate booth hidden under another shape (Possible duplicate booths), or contact support.
