
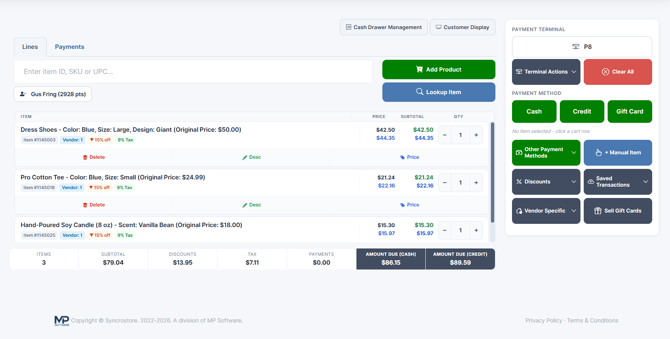
The layout
Left column — the sale. At the top are two tabs, Lines and Payments. Lines is where you build the sale; Payments lists every tender you've taken on it so far.
Under the tabs sits the scan box, the Add Product and Lookup Item buttons, and the Select or add a customer button. Below those is the cart itself, then the totals panel.
Right rail — money and actions. From the top: your register selector, Terminal Actions and Clear All, the three main payment buttons (Cash, Credit, Gift Card), and then everything else — other tenders, discounts, saved transactions, layaway, vendor actions and gift card sales.
Top-right utility bar. Cash Drawer Management and Customer Display.
Your first sale
- Pick your register when prompted. You cannot ring a sale until you do — see Selecting Your Register.
- Scan a barcode, or type an item ID, SKU or UPC into the scan box and press Enter.
- Repeat for every item. The cursor returns to the scan box automatically after every action, so you can keep scanning without clicking.
- Press Cash, Credit or Gift Card and follow the prompts.
- On the Sale complete dialog, press New sale.
That's the whole loop.
Things that will save you time later
- The cursor always comes back to the scan box. After you close any window, after you add an item, after you change a quantity. You should almost never need to click into it.
- Messages appear briefly at the top of the screen and disappear after about two and a half seconds. Green means it worked, red means it didn't. Only one shows at a time, so if two things happen at once you may only catch the second.
- The cart is stored on the server, not in your browser. Reload the page, or come back on another machine as the same cashier, and the sale is still there.
