
Layaway holds an item for a customer against a down payment, with the balance paid off over time.
The Layaway menu only appears if layaway is switched on in your store preferences and your plan supports it. If you can't see it, that's why.
Creating a layaway1. Click the item in the cart to select it. The card turns green and the right rail shows "Selected: …". Without this you'll see:
Select a cart row to put on layaway.
2. Attach the customer. Layaway needs one — "Attach a customer before creating a layaway." See Attaching a Customer to a Sale.
3. Open Layaway → Layaway Item.
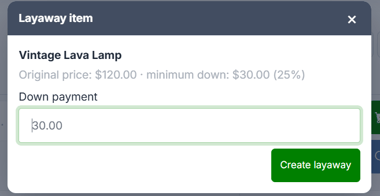
The window shows the item, its original price, and the minimum down payment your store requires as both a dollar figure and a percentage. The Down payment box is pre-filled with that minimum.
4. Adjust if the customer is paying more, and press Create layaway.
5. Take payment for the down payment as normal.
What changes on the saleThe line stays where it is but is rewritten: the description gains "LAYAWAY ITEM" and the original price, the price becomes the down payment, and the row gets a LAYAWAY tag.
So the sale collects the down payment only. The rest is owed.
Tax on layawayNo tax is charged on the down payment. The full tax is added to the layaway balance and collected as the customer pays it off.
The TAX line won't move when you create a layaway. That's correct — the tax hasn't disappeared, it's in the balance.
What can't go on layawayGift cards, rent payments and items already on layaway: "Cannot put this item on layaway."
Items below your store's minimum layaway price are also refused, and the message tells you the minimum.
Related- Taking a Layaway Payment
